Introduction
The Performas of the 62x0 and 63x0 series are not only
the slowest PowerPC equipped Macs ever built (75MHz 603, 15MB/sec memory
performance), they also have the least thought through power supply ever
made. The case is tight and offers only little space for the power supply,
still the only fan in those machines is situated above the CPU blowing
the air up. Too bad most people used to put their screen on top of that
blower hole, literally reducing the air flow inside those systems to zero.
And last but not least, the powersupply is placed in a small metal cage,
that has only a couple of small holes that do not even look in the same
direction as the fan. Inside the power supply, aluminium "heatsinks"
again cut the last possible airflow to pieces.
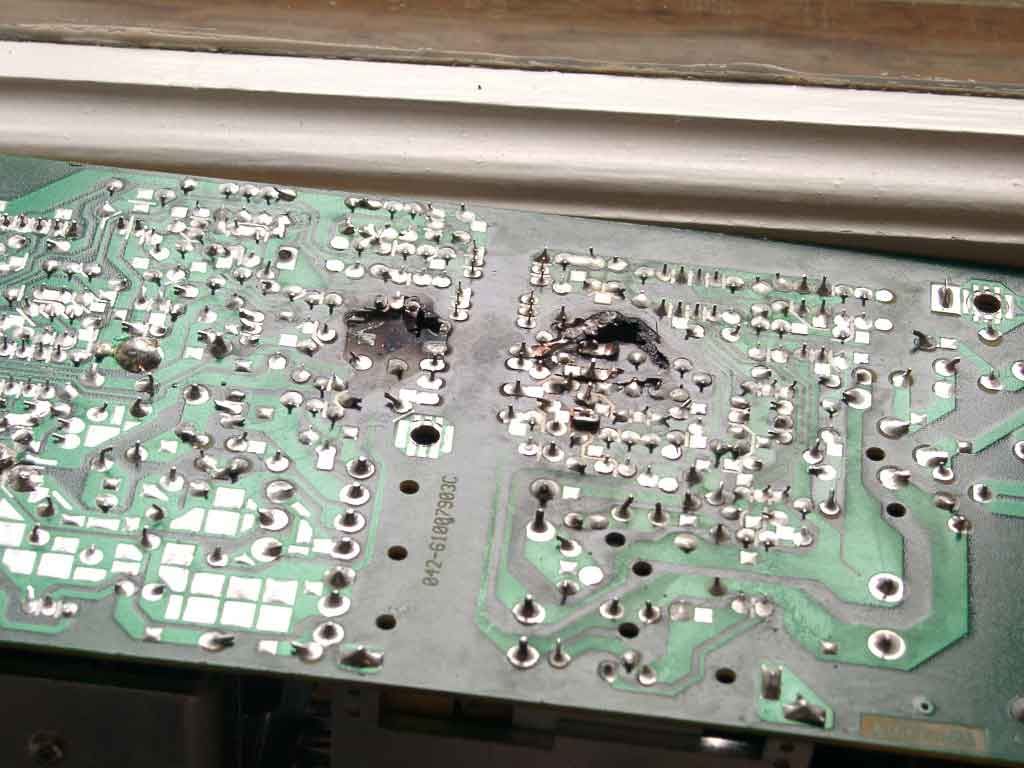
So, what does that mean?, you may say. Well unfortunately, some of the
resistors inside the power supply produce heat levels near those of a
flame, that is no joke. The lack of cooling results in a huge heat build-up
that again causes the resistors and the card they are located on to burn.
After a few years of use, that usually means the circuitry on your powersupply
has turned to ashes and the computer will no longer start up.
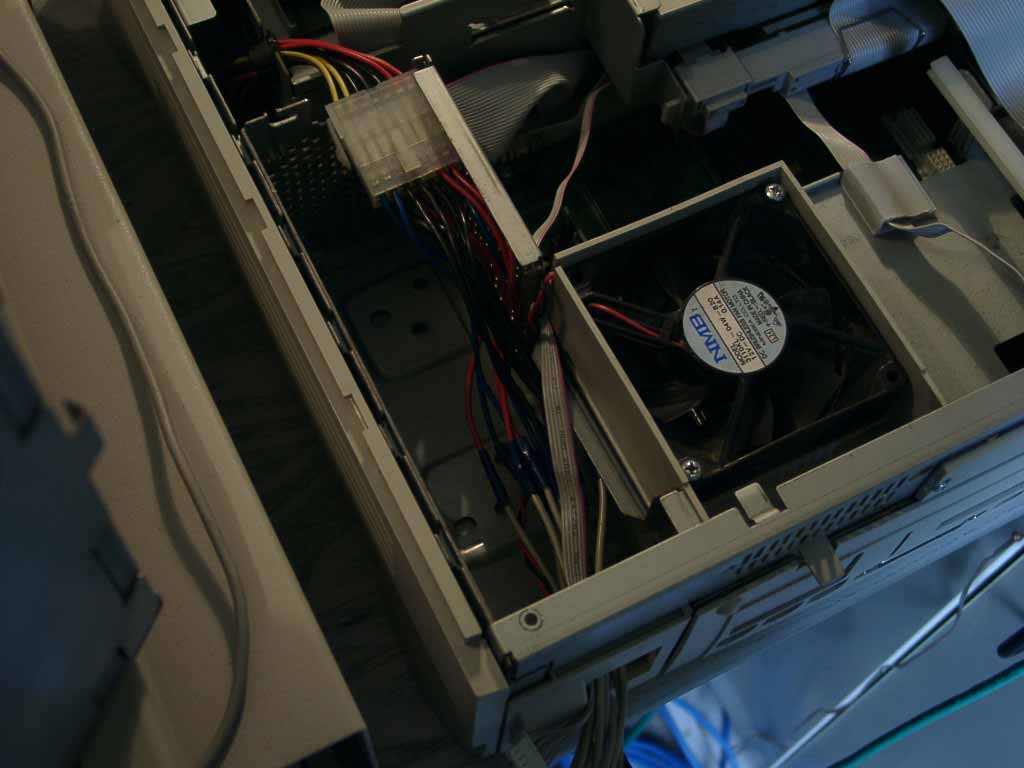
I got 6 old Performa 6200 about a year ago, they all had been used heavily in a printshop and I soon discovered that 5 of them had burnt power supplies. Since I had gotten them for free, I didn't really care and simply took out the things I could use and gave the rest away to tinkerers with money enough to buy replacement parts. The sixth of them could be animated to run when it was cooled with a fan on top of the power supply. I illustrated this procedure a while back. Read it now to understand the rest of this article.
How
to fix it
About half a year
after I did this, also the last power supply had died and I was forced
to try something new.
I needed a new power supply, but didn't know where to get an original
one, nor didn't actually want to have such a faulty part again. I peered
at one of those old Quadra 840av machines and found that their power supplies
had to be similar to the one of the Performa.
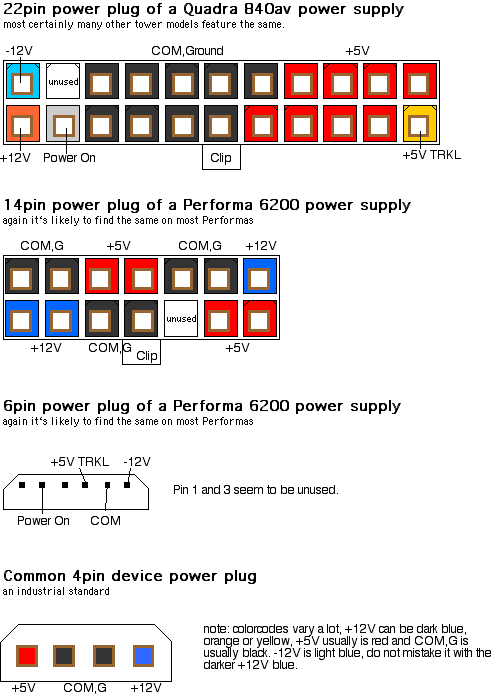
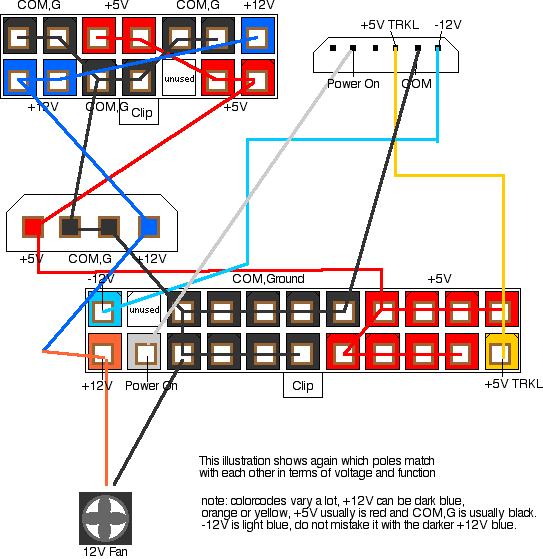
I removed the power supply from both the Quadra and the Performa. Of course I soon discovered that they had radically different plugs but obviously the same voltages. All I had to do is find out which wire correspinded to each other. Since I lack a volt-meter (which would definitely be a handy thing to have) I had to use the trial and error, or better retry-abort-toast method. I burnt a transistor on the motherboard during that procedure, but fortunately it kept working. After that I opened the window to let the stench go out a bit and found that I had managed to find the corresponding wires. The following picture shows my final results (could have been done nicer, but it works like that too):
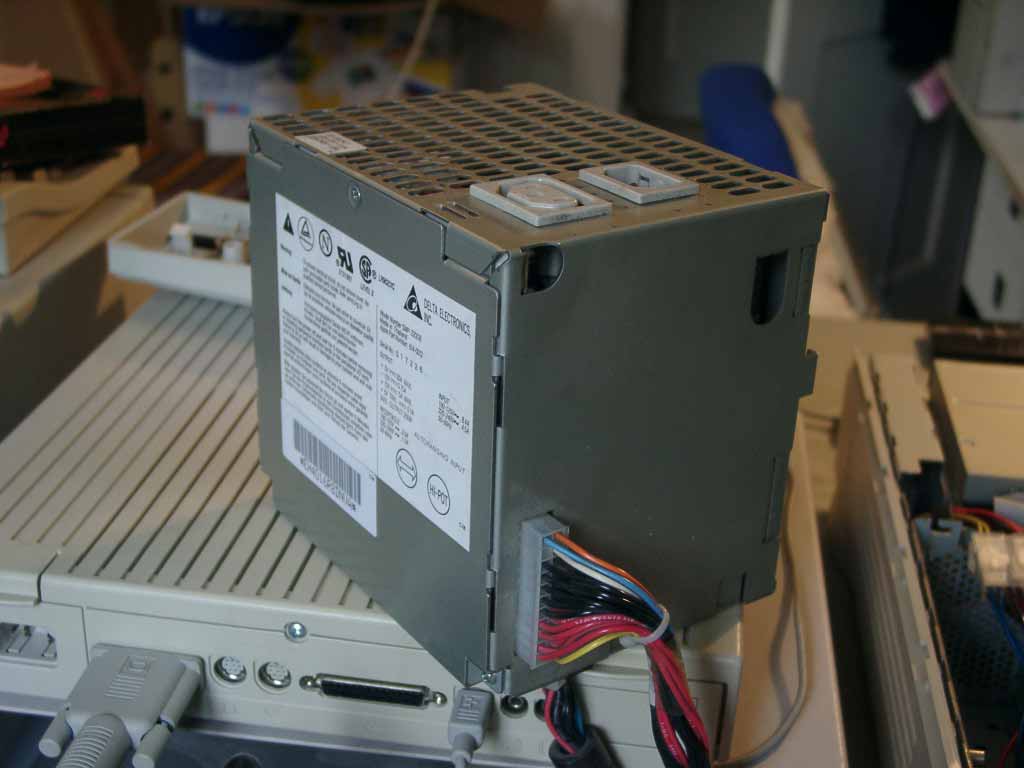
The new power supply.
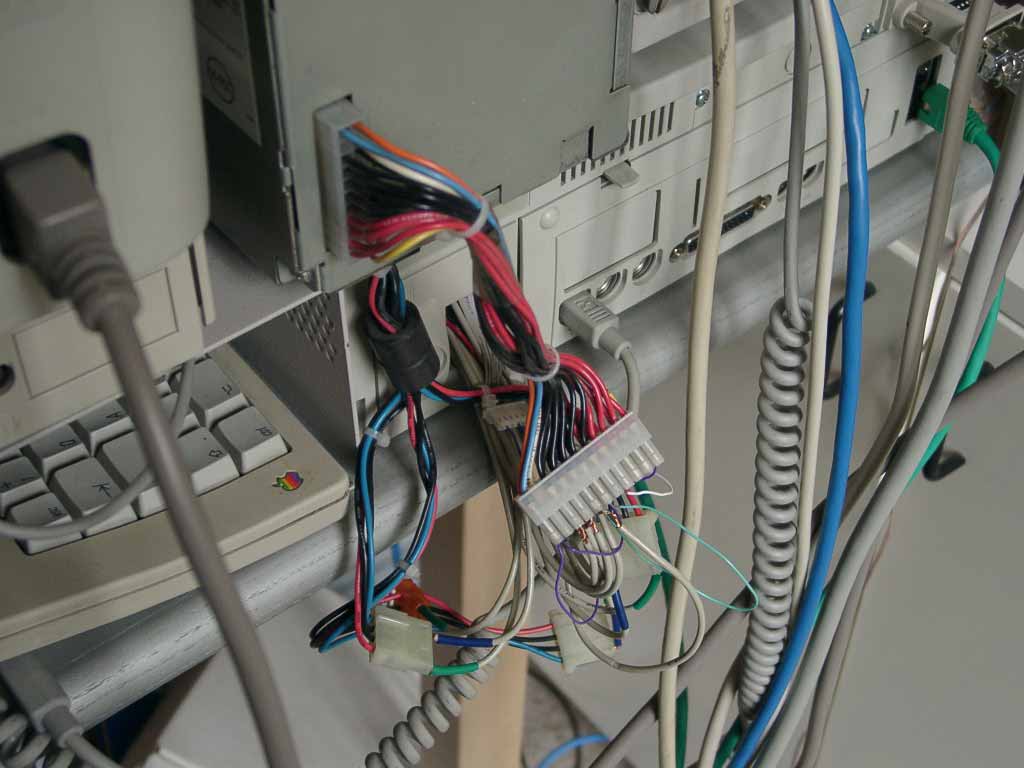
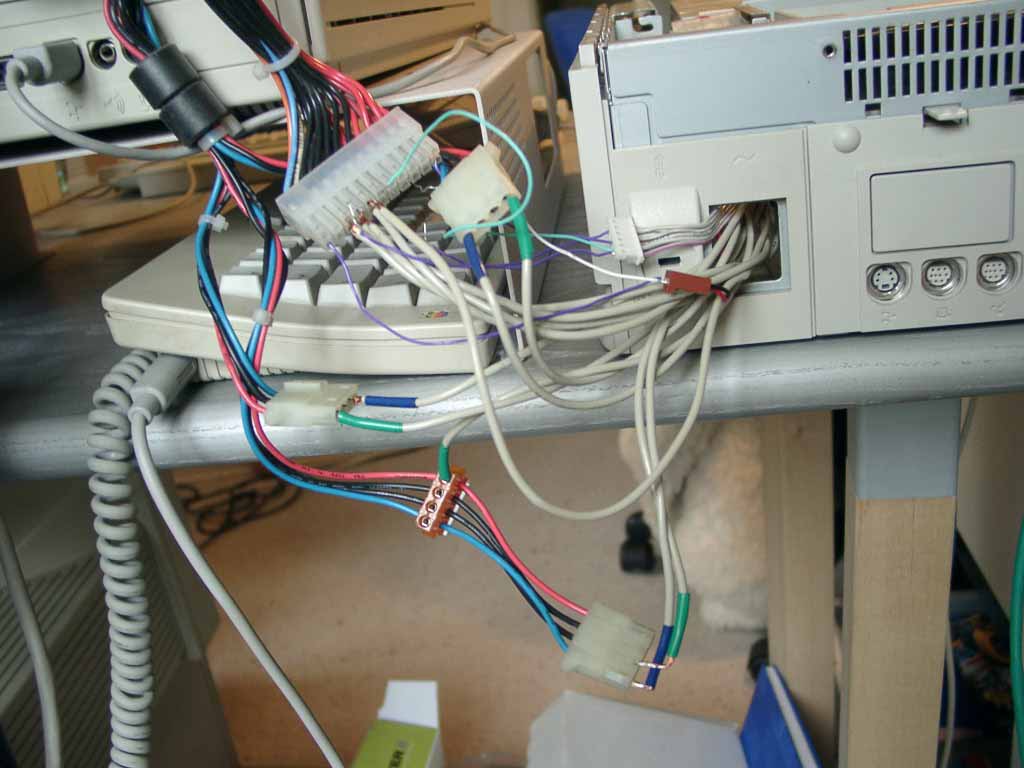
Getting connected.
(2 pictures)
(note: some cables have been detached during the shootings, do not take the pictures as a guide.)
Connecting
the two
Once you have made yourself familiar with the pincodes of each plug, you'll
easily find which cable has to be connected with which plug. The most
important
thing to remember is, that you never short two cables that should not
be shorted and that you never plug a wire in the wrong plug. Plugging
the -12V cable of the Performas 6pin plug into the +12V plug of the Quadra
will fry your motherboard, so take care.
You'll soon find that you don't have long enough cables to pull them out of the Performa and connect them with the new power supply. To help this, you will most certainly have to solder a little bit. It can be done without, but I recommend soldering it. You won't need any soldering skills, it's all about linking 2 wires.
First
you have to unsolder the wires off your burnt powersupply, in my example
this is the 14pin red-blue-black plug with its cables, however, color-coding
of all the wires obviously isn't standardized, so you'll have to see what
corresponds first. Then add about 20-30cm (10 inch or so) of wire (isolated)
to each cable.
Once you have done that, isolate the connections with some tape and pull
the wires out of the former high-voltage power plug on the Mac of the
Performas case. Do the same with the cable of the fan and the 6pin plug
cable. You can then close your Performa back up.
Now hopefully you were clever enough to somehow mark what wire has to be connected to which plug of the Quadra powersupply, you can do this by marking them with the corresponding color, either with some colored tape or with some pen or whatever, just make sure you know which ones are +5V, +12V and COM or Ground. TRKL, Power On and -12V on the 6pin plug should remain clear. The Quadra only has one -12V pole on the motherboard plug (22pin). +5V and +12V can be gotten from either the device plugs or the motherboard plugs, although I'm not sure whether that dubious +12V pole really is what I mean, might be something else. I recommend getting all +12V power off the device cables. The most important thing is now to connect the Power ON and +5V TRKL on the 6pin and the 22pin plugs. Without these you won't be able to start up or shut down the computer with a button or with your keyboard. The -12V pole on the 6pin connector is used for sound it seems, never plug that into the orange +12V(?) pole, I think I just fried my sound.(duh) (update: no, I didn't, and I'm now sure the orange pole is +12V)
Once you have connected all the cables to their corresponding place and everything is isolated where it would touch each other otherwise, you can plug in the new power supply into your power point and try to boot your Mac. If it doesn't work, you have to check again if everything is set right. But please, remember to unplug the supply before you fiddle with it again.
The
fan is the last special case. It has its own pluglet originally, but it
uses 12V power, so you can simply attach it to a +12V and a COM pole from
a device cable. However, it will only run if you connect it properly.
See the sticker on top of it to determine which cable is + and which is
-. Note that you'll always get the difference on voltage between the 2
poles on the item you connect. If you need 12V, you can do so by attaching
it to the +12V and the Ground (0V) for a difference of 12V. You could
also get Ground and -12V.
Also +12V and +5V works, but will turn slower (7 Volts difference). More
sensitive devices like drives don't allow for such experiments of course,
they tend to spoil the game quickly.
A fair warning
As usual, whenever it comes to tinkering with computer
hardware, dangers are involved.
Please read this carefully before you decide to do it yourself:
- Never work with any powersupply plugged into the powerpoint
- Never leave your soldering gun alone without detaching it from power first
- Isolate all open wires whereever possible
- Never reach inside a powersupply, no matter with what, even if it's just been disconnected, always wait for about 5 minutes for electric charges to discharge
- Never short or mistakenly connect two cables of different voltages, or your computer may go byebye in a cloud of really nasty stinking smoke
- NEVER ever do something you feel you are not capable of. If you have trouble exchanging a lightbulb, this article is read-only. Or then be ready to take the risk.
- And last but not least, I'll not take any responsibility for anything you do, that hurts you, your computer or someone/something else. It's all on your own risk.
Text: © by Bensch Blaser, Jul. 2000, all trademarks
are property of their respective owners.
Pictures: © by Bensch Blaser, Jul. 2000